Introduction to Android Development
Welcome to this introductory tutorial series on Android development! Whether you're a complete beginner or have some programming experience, this guide will help you get started with building your own Android applications.
Tutorials Covered:
What is Android?
Android is a mobile operating system based on a modified version of the Linux kernel and other open-source software, designed primarily for touchscreen mobile devices such as smartphones and tablets. Developed by Google, it's the most widely used mobile operating system globally.
Key characteristics of Android:
- Open Source: The Android Open Source Project (AOSP) provides the core Android platform, allowing device manufacturers and developers to customize and extend it.
- Linux Kernel: Android is built on a robust and stable foundation.
- Versatile: Runs on a wide range of devices from different manufacturers.
- Large App Ecosystem: The Google Play Store offers millions of applications.
- Developer-Friendly: Provides a comprehensive set of tools and APIs for app development.
Setting up your development environment (Android Studio)
The primary Integrated Development Environment (IDE) for Android development is Android Studio, provided by Google. It includes everything you need to write, test, and debug Android apps.
Steps to set up Android Studio:
- Download Android Studio: Go to the official Android Studio website (developer.android.com/studio) and download the latest version for your operating system (Windows, macOS, or Linux).
- Install Android Studio: Follow the on-screen instructions. The installation process will typically involve downloading and installing necessary components like the Android SDK (Software Development Kit).
- Configure Android Studio: Upon the first launch, Android Studio will guide you through initial setup, including selecting SDK components and setting up proxies if needed. It's recommended to install the latest SDK Platform and corresponding system images for emulators.
- Verify Installation: Once installed and configured, you should see the Welcome to Android Studio screen, where you can start a new project or open an existing one.
Make sure your computer meets the system requirements for Android Studio to ensure a smooth development experience.
Understanding the Android architecture
Android has a layered architecture, with each layer providing specific services and functionalities. Understanding this architecture is crucial for effective development.
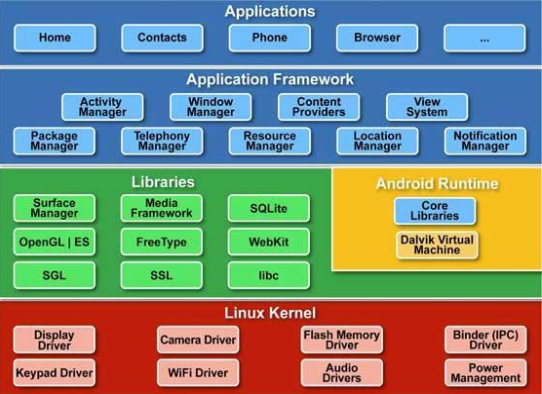
The key layers from bottom to top are:
- Linux Kernel: Provides core system services like process management, memory management, device drivers, and networking.
- Hardware Abstraction Layer (HAL): Provides standard interfaces that expose device hardware capabilities to the higher-level framework.
- Native Libraries: A set of libraries written in C/C++ that provide various functionalities, including SQLite for database access, WebKit for web browsing, and OpenGL ES for 3D graphics. The Android Runtime (ART) also resides in this layer.
- Android Runtime (ART): The runtime environment that executes Android applications. It uses ahead-of-time (AOT) compilation to improve performance.
- Application Framework: Provides high-level building blocks that applications can use, such as Activity Manager, Window Manager, Content Providers, and Resource Manager. Developers interact with these components through Java/Kotlin APIs.
- Applications: The top layer, where all the installed user applications reside, including both system applications and third-party apps.
Your first "Hello World" app
Let's create a simple "Hello World" application to get familiar with the basic project structure and UI development.
Steps:
-
Start a New Android Studio Project:
- Open Android Studio.
- Click "Start a new Android Studio project" or "File > New > New Project...".
- Choose a project template. For a simple app, select "Empty Activity".
- Click "Next".
-
Configure Your Project:
- Name: Give your application a name (e.g., "My First App").
- Package name: A unique identifier for your app (usually in the format
com.yourcompany.yourappname). - Save location: Choose where to save your project files.
- Language: Select Kotlin or Java. We'll use Kotlin for this example (it's the recommended language).
- Minimum SDK: Choose the minimum Android version your app will support. A lower API level supports more devices but might lack newer features.
- Click "Finish".
-
Explore the Project Structure:
Android Studio will create a project with various files and folders. Key directories include:
app/java/com.yourcompany.yourappname: Contains your Kotlin/Java source code.app/res: Contains resources like layouts, drawable images, strings, etc.app/res/layout: Contains XML files that define the user interface layout.app/AndroidManifest.xml: The manifest file that describes the fundamental characteristics of your app and its components.
-
Modify the Layout (activity_main.xml):
Open
app/res/layout/activity_main.xml. You'll see a visual layout editor and the XML code.In the "Design" view, you can drag and drop UI elements. In the "Code" view, you can edit the XML directly.
Find the
TextViewelement and change itsandroid:textattribute to "Hello, Android!".<TextView android:layout_width="wrap_content" android:layout_height="wrap_content" android:text="Hello, Android!" app:layout_constraintBottom_toBottomOf="parent" app:layout_constraintEnd_toEndOf="parent" app:layout_constraintStart_toStartOf="parent" app:layout_constraintTop_toTopOf="parent" /> -
Run the App:
- Click the "Run" button (green play icon) in the toolbar.
- Android Studio will prompt you to select a deployment target (emulator or physical device).
- Choose an emulator or connect a physical device (see the next section).
- Click "OK".
Android Studio will build and install your app on the selected device, and you should see "Hello, Android!" displayed on the screen.
Using the Android Emulator and physical devices
To test your Android applications, you can use either the Android Emulator provided with Android Studio or a physical Android device.
Android Emulator:
The Android Emulator simulates Android devices on your computer. It's useful for testing your app on various screen sizes, Android versions, and hardware configurations without needing physical devices.
Creating an Emulator (AVD - Android Virtual Device):
- Go to "Tools > Device Manager" (or "AVD Manager" in older versions).
- Click the "+ Create Virtual Device" button.
- Choose a hardware profile (e.g., Pixel 4).
- Select a system image (Android version) to install on the emulator. You might need to download one if you haven't already.
- Click "Next" and then "Finish".
You can launch an AVD from the Device Manager or directly from the run configuration dropdown in the toolbar.
Physical Devices:
Testing on a physical device provides a more realistic experience and allows you to test features that might not be fully supported by the emulator (like camera or certain sensors).
Setting up a physical device for development:
- Enable Developer Options: On your Android device, go to "Settings > About phone" (or "About tablet"). Tap "Build number" seven times. You should see a message saying "You are now a developer!"
- Enable USB Debugging: Go back to "Settings" and you should now see "Developer options". Tap on it and enable "USB debugging".
- Connect your device: Connect your Android device to your computer using a USB cable.
- Authorize USB Debugging: On your device, you might see a dialog asking to authorize USB debugging from your computer. Grant the authorization.
Once set up, your physical device should appear in the list of available devices when you run your app in Android Studio.
Basic debugging in Android Studio
Debugging is an essential part of the development process. Android Studio provides powerful debugging tools to help you identify and fix issues in your code.
Key debugging features:
- Breakpoints: You can set breakpoints in your code by clicking in the left margin next to a line number. When the application execution reaches a breakpoint, it will pause.
-
Debugging Toolbar: The debug toolbar appears when you start a debug session. It includes buttons to:
- Resume Program: Continue execution.
- Step Over: Execute the current line and move to the next line in the same method.
- Step Into: Step into the method call on the current line.
- Step Out: Exit the current method and return to the calling method.
- Variables Window: Shows the values of variables in the current scope when execution is paused at a breakpoint.
- Console/Logcat: The Logcat window displays system messages, including logs from your application (using
Log.d(),Log.e(), etc.). This is invaluable for understanding the flow of your application and identifying errors. - Debugger Console: Allows you to evaluate expressions and execute code snippets while the application is paused.
Steps to debug your app:
- Set a breakpoint: Open a Kotlin/Java file and click in the left margin next to a line of code where you want execution to pause. A red dot will appear.
- Start the debugger: Click the "Debug" button (the bug icon) in the toolbar.
- Select a deployment target: Choose an emulator or physical device.
- Interact with your app: Use your app on the device/emulator until the execution reaches the breakpoint.
- Inspect variables and step through code: Use the debugging toolbar to step through your code, and the Variables window to inspect variable values.
- Use Logcat: Add log statements in your code (e.g.,
Log.d("MyTag", "My message")) and monitor the Logcat window for output.
Debugging takes practice, but mastering these basic features will significantly improve your ability to troubleshoot your Android applications.
This concludes the introductory tutorials. You've learned the basics of what Android is, how to set up your development environment, the fundamental architecture, how to create a simple app, run it on emulators and devices, and perform basic debugging. Keep practicing and exploring the vast world of Android development!